Your questions answered
FAQ - Common questions
PRE INSTALLATION – CHECK LIST
Whether or not Aquataps are doing your installation or you are installing the Aquatap yourself please see the basic requirements you will need in order to install the Aquatap.CONNECTION TO A MAINS WATER SUPPLY
Connection to a mains water supply, with both the hot and the cold water having a pressure between 1.5 Bar and 5 Bar. If the water pressure exceeds 5 bar a pressure reducing valve must also be used.
3 PIN 13 AMP PLUG SOCKET
A standard 3 pin 13 Amp plug socket is needed in the cupboard near your boiler.
You will need an extra 13 amp socket for the chiller option (5 in 1 Taps).
WATER SUPPLY SHUT OFF VALVE
The ability to shut of your water supply with knowledge of where your stop cock is.
SINK WASTE PIPE
An under sink waste pipe already in place.
ROOM UNDER THE SINK
Enough room for your boiler under your sink:
2.4 litres boiler (300mm High, 190mm Wide & 190 mm Deep)
4 litres boiler (300mm High, 190mm Wide & 300mm Deep)
If you are choosing a chiller check you have enough room (420mm High, 250mm Wide & 400mm Deep) If a chiller is being used good ventilation will also be required and your cupboard may require a ventilation grill.
A 35MM HOLE FOR THE TAP AND SPACE BEHIND THE TAP
Generally a 35mm hole will be required for the tap but this may vary depending on the model. Please check the model specification for exact dimensions.
About Aquataps
Will the Aquatap fit into the same size hole as my current tap?
Yes, each model has a slightly different size of cartridge which is highlighted in the description for each model.
What is the warranty on my Aquatap?
Aquataps offer a 5 Year Warranty on all their filtered water taps and 2 Year warranty on the Boiler.
The Warranty on your tap starts from day of purchase. If you are not installing your tap shortly after purchasing, then we are unable to extent the warranty as we cannot monitor all our customers. If you do have a specific date for installation, then you can arrange for your purchase to remain at our warehouse until the required date. This way your warranty will not be affected.
Will the Aquatap still dispense normal hot and cold water?
Yes, The Aquatap will dispense normal Hot and Cold water like your current tap. Depending on the model that you choose it will also dispense filtered boiling hot water (3 in 1) or filtered boiling and cold water (4 in 1) as an extra function.
How much space will the Aquataps boiler need under my sink?
Our boilers are 19cm wide, 19cm deep and 26.5cm tall.
Do I need to consider space for anything else in the cupboard?
Yes, You will also need to fix the filter housing to the side or back of the cupboard. The height of the filter housing is 30cm and the width including space for the connected pipes is 30 cm.
The standard cupboard size is 600mm, which is sufficient.
What are the dimensions of the Aquataps?
Each tap model has different dimensions. Please check the product description for each product.
I live in a hard water area, will this cause a problem?
No, over 50% of people are affected by hard water. The Aquatap comes with two filters that will reduce scale, however if you live in a very hard water area we would suggest descaling the boiling water tank, for information on how to do this please contact our customer service team. These filters should be changed every 6 months or 2000 litres of water.
Installation
Do you offer an installation service?
Yes we do. However please check on our website if we cover your area.
Can I install the Aquatap myself?
What tools are required to install an Aquatap?
All the parts required for the installation are included in your package. You will also require a Philips & flat head screwdriver and X2 adjustable spanners.
Can the Aquatap be installed on any work surface?
Yes, The Aquatap can be installed on any work surface. However, please consider that the Triangular cushion and washers that are used under the work surface to tighten the tap down require a solid base to be tightened to. If the underneath of your work surface is soft this may need to be cut away to create a solid base to clamp the Aquatap down to.
How do I check my water pressure?
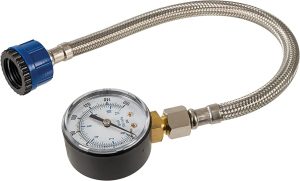
Even if you have good water pressure, it is advisable to do an actual test, so you have an accurate bar reading. Water Pressure gauges can be purchased online. Below is an example of the Pressure gauge we would suggest.

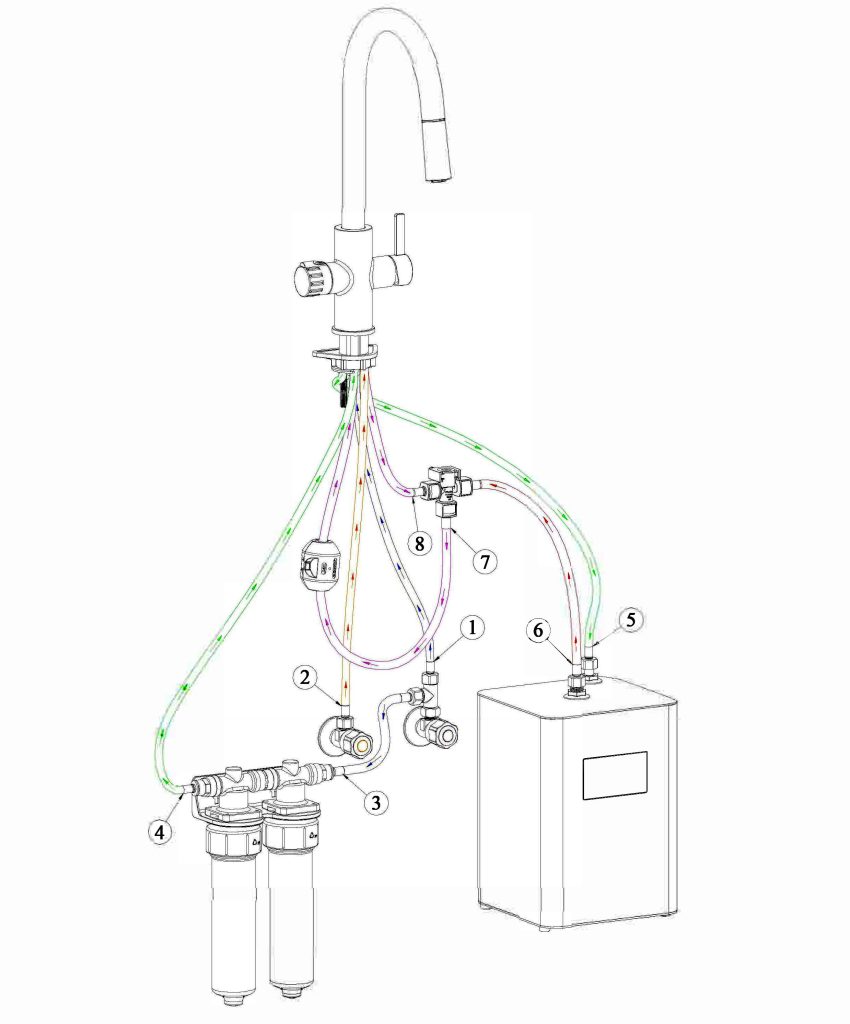
This needs to be done at source, meaning you need to screw this into the hot water pipe in your kitchen, most likely to be located under your sink, which connects to our tap pipes. The below diagram shows an example of the set up and step by step procedure for testing the pressure.
- Turn off the hot water pipe by twisting the handle attached to hose 2.
- Disconnect hose 2 from the hot water pipe.
- Screw the pressure gauge onto the hot water pipe.
- Turn the hot tap back on and the pressure should increase.

I have low water pressure, what can I do?
- If you have a combi boiler, we suggest you contact your heating engineer to see if he can increase the flow.
- If you have a tank fed system, you can purchase a water pump which can be fitted to the hot water tank.
Power and Plumbing
What power connection does the Aquataps Boiler require?
Our boilers all run off a standard UK 3 pin 13 amp plug. The power cable for the boiler is 1.5 metres long so you will require a plug socket within about 1 metre of the boiler.
What is the minimum water pressure required for the Aquatap?
The minimum water pressure required for the Aquatap is 1.5 Bar. Most residential homes will have 1.5 bar of pressure already. If you are in doubt you can ask a plumber to measure this before.
Is it a problem if I have high water pressure?
If your water pressure is above 5 bar then you will require a pressure reducing valve.
Safety
What power connection does the Aquataps Boiler require?
Our boilers all run off a standard UK 3 pin 13 amp plug. The power cable for the boiler is 1.5 metres long so you will require a plug socket within about 1 metre of the boiler.
Will the tap get hot to the touch when using the boiling water?
No, apart from the spout where the water comes out the Aquataps are safe to touch when using the boiling water.
PLEASE READ - PULL OUT SPRAY | AQUATAPS ULTRA Product Disclaimer
Please note, due to the way this style of tap is plumbed in, there is a chance residual boiling water can stay inside the spray nozzle pipe, directly after instant use. Meaning, that when using the mixer handle immediately after using the boiling water there is a small amount of residue boiling water (only approx 50ml) that comes from the nozzle first.
Use & Maintenance
How often should I change the filter?
The carbon filter should be changed every 6 months and the anti-scale filter every 6 months or 2000 litres of water.
How do we change our filters?
It is very easy to change the filter.
- Firstly, both water supplies need to be turned off.
- Then place a bowel or towel under the filter housing as some water will leak.
- Twist the filter to take it out of the housing.
- Unscrew the top of the filter housing.
- Remove the old filter and replace with a new one.You want the water to go through a Sediment filter first (White Filter) then the Carbon Filter – Grey with White Mesh. The Sediment filter will prolong and protect the Carbon filter.
- Screw the top back on and then place it back into the main housing unit. The whole process should only take a few minutes.
- IMPORTANT! When you change your filters, you will need to flush them through with a couple of litres of cold water to ensure that no sediment has been left in the boiler, allowing your filters to work at optimum capacity.
What do our filters remove?
Filter types:
- White filter is for Sediment
- Grey with white mesh filter is for Carbon
- Sediment filters, filter out small bits of dirt and sediment while Carbon filters remove impurities
Which is first, carbon filter or sediment filter?
You want the water to go through a Sediment filter first, so it does not clog up the Carbon filter. The Sediment filter will prolong and protect the Carbon filter.
Our filters remove:
Chlorine: 99.5%
Trichloromethane: 95.78%
Lead: 98.4-99.2%
Arsenic: 97.8%-86.7%
Iron: 99.5%
Manganese: 98.7%
Should I switch my boiler off if I go away?
If you are away for more than 2 days, then we would suggest you switch your boiler off completely.
How do I know if I have used 2000 litres of water?
There is no ‘count’ on your boiler to indicate what your usage is however this equates to 11 litres per day so if your usage is more than this, then please let us know so we can arrange filters earlier than every 6 months.
I would like to change the range setting on my boiler, how do I do this?
The range settings can be adjusted which allows the temperature to reduce by either 3, 5, 7 or 9 degrees before it heats up. To do this you need to press the set button to the right of the blue on/off button, located on the front of your boiler, press this until you hear the beep, then immediately remove your finger. If this is not done immediately it will revert to changing your temperature setting rather than the range setting. Keep trying until you get the correct display, this will then allow you to change the setting. Once set this will be the minimum setting your temperature will reduce by before heating up again.
How much electricity does my tap use?
Your tap will use about 0.75 Kilowatts in 24 hours.
How do I clean my tap?
Use a soft cloth with warm water and a light detergent.
DO NOT USE ABRASIVE OR HARSH CHEMICAL PRODUCTS AS THESE COULD DAMAGE YOUR TAPS FINISH
Payments
Which payment platform do we use?
We use Stripe for all online payments. The card details enter Stripe’s payment gateway, which encrypts the data. Stripe sends that data to the acquirer, which is a bank that will process the transaction on the merchant’s behalf.